SASS
기존 웹페이지에 스타일을 적용하기 위해서는 CSS로 하나하나 변경해주어야 하는 번거로움이 있다. 이 같은 CSS의 개발 편의성을 높이기 위해 등장한 SASS, 프리프로세서 스크립트 언어이다. CSS의 경우 HTML환경에 style 태그만 지정해주면 바로 로드가 되는데 이 SASS란 녀석은 그렇지가 않다. 사용하기 전에 CSS로 컴파일하는 과정이 필수다. 그래서 보통 웹팩과 함께 사용된다.
1. 필요 라이브러리 설치
npm i webpack webpack-cli sass sass-loader style-loader mini-css-extract-plugin css-loader
설치를 완료해주면 웹팩 설정파일을 만들어준다.
2. webpack.config.js
import MiniCssExtractPlugin from "mini-css-extract-plugin";

export default
{
    "entry":["./frontend/public/js/handle.js"],
    "watch": true,
    "output": {
        "filename": "index.js",
        "library": "handle"
    },
    "plugins": [
        new MiniCssExtractPlugin({ filename: `style.css` })
    ],
    "module": {
        "rules": [{
            "test": /\.s[ac]ss$/i,
            "use": [
                MiniCssExtractPlugin.loader,
                "css-loader",
                "sass-loader",
            ],
        }],
    },
}
엔트리 파일로 자바스크립트 파일을 지정해준다. 이후 여기에 SASS를 임포트 하는 파일이다. 참고로 경로는 상관없다.
3. style.scss
.style {
  border: none;
}평소 CSS 문법처럼 작성해주면 된다. SASS에서 지원하는 다양한 문법을 사용하기 위해서는 아래 문서를 확인하면 된다.
https://sass-lang.com/documentation/syntax
Sass: Syntax
Sass supports two different syntaxes. Each one can load the other, so it's up to you and your team which one to choose. The SCSS syntax uses the file extension .scss. With a few small exceptions, it’s a superset of CSS, which means essentially all valid
sass-lang.com
4. 임포트
웹팩에서 엔트리 파일로 지정한 JS파일에 다음과 같은 구문을 입력해준다. 경로는 SASS파일이 있는 곳이다.
// file: ./frontend/public/js/handle.js
// 아래 구문을 JS파일에 입력해주면 된다.

import "../sass/style.scss";
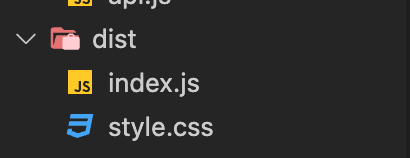
5. 확인
서버에 /dist 폴더가 새롭게 생성되며 다음과 같은 화면을 볼 수 있다.
'💻기술 > NodeJS' 카테고리의 다른 글
| [ NodeJS ] winston 콘솔에서 색상 지정하기 (0) | 2022.06.12 |
|---|---|
| [ ES6 ] webpack 5 자바스크립트 난독화 (0) | 2022.03.22 |
| [ NodeJS ] Express에서 다중 라우터 사용하기 (0) | 2022.01.02 |
| [ 코드보며 배우는 NodeJS ] EJS 초기 코드 (0) | 2020.03.30 |
| [ 코드보며 배우는 NodeJS ] 초기 코드 세팅 (0) | 2020.03.17 |